
User Guide#1 - Home Page, Navigation & Concepts
Version: 1.07
Based on Product Release: 5.04.34
User Types/ Viewing Other Users
Add/Edit Related Internal Notes
View Tasks Linked to an Internal Note
Events (On Track and Off Track)
Sales Cases with Action Required
Navigation & Insight Concepts
Insight contains a number of navigation mechanisms and functions that are present in the interface regardless of the screen currently being viewed.
It is important to understand the basic navigation mechanisms in order to get the best out of Insight. There are also some key concepts that once grasped, will help each User to access the wealth of information quickly and efficiently.
Menu Bar
The menu bar gives access to the main modules for which the User has permissions to view.
![]()
§ Home - Displays the User’s Home Page which contains relevant personal information, including recently allocated tasks.
§ Events - Provides a summary of current information relating to Testing, Training and Assessments Events that have been scheduled and/or booked.
§ L & S - The Learning & Supervision module enables access to view, allocate, and manage Tracks, Assessments, Licences, Competencies, Qualifications, Professional Bodies, Action Plans, and Actions, and enables access to the MI Dashboards for this module.
§ CPD – The CPD module enables access to create, view, and manage CPD Plans and Activities, and SPS Requests, and enables access to the MI Dashboards for this module.
§ Training – The Training module enables access to view, create, and manage Training Courses, Training Events, Course Nominations, and Training Bookings, and enables access to the MI Dashboards for this module.
§ Testing – The Testing module enables access to view, allocate, and manage Test Events, Test Bookings, and Reference Material, and enables access to the MI Dashboards for this module.
§ Risk – The Risk module enables access to view, create, and manage KPIs, Risk Assessments, and Quality Reviews, and enables access to the MI Dashboards for this module.
§ Complaints – The Complaints module enables access to view, create, and manage Complaints, and enables access to the MI Dashboards for this module.
§ Checking – The Checking module enables access to view, create, and manage Sales Cases, Sales Case Checks, and the Monitoring of Sales Case Checks, and enables access to the MI Dashboards for this module.
§ Cases – The Cases module enables to access to general purpose cases and the current allocation of those cases.
§ Recruitment – The Recruitment module enables access to view, create, allocate, and manage Applications, Recruitment Activities, and Approvals.
§ Promotions – The Promotions module enables access to view, create, and manage Financial Promotions and Financial Promotion Versions, to Authorise and Review them, and to the MI Dashboards for this module.
§ Personnel - The Personnel module enables access to view, create, and manage User, User Position, and Firm details, and access to manage User Groups and Supervision and Business Hierarchies.
§ Business Intelligence – The Business Intelligence menu enables access to various Dashboards and reports from across all the modules in Insight.
User Control Panel
The user control panel gives quick access to common functionality that’s used throughout Insight.

Each area of the user control panel is discussed in the following sections.
View Modes
Insight has various View Modes that can be applied to most screens to change the population of data being displayed. The View Mode is a key concept in Insight, the understanding of which will help you to access the right information much more quickly.
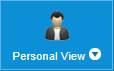
The currently selected view icon appears as the first widget in the user control panel. To select a different view, click on the dropdown arrow next to the icon to show the view mode menu:
![]() Personal View - This is the default view for each
User when logging in and displays information relating to the logged in User
only. This will display records owned by the user, or where they are they are
the Event Supervisor (of Assessment Bookings) or Internal Owner (of Actions).
Personal View - This is the default view for each
User when logging in and displays information relating to the logged in User
only. This will display records owned by the user, or where they are they are
the Event Supervisor (of Assessment Bookings) or Internal Owner (of Actions).
![]() Shallow Span View - Displays information for the
logged in User’s immediate span of control based on the supervision hierarchy.
This will include records owned by Users and Firms.
Shallow Span View - Displays information for the
logged in User’s immediate span of control based on the supervision hierarchy.
This will include records owned by Users and Firms.
![]() Deep Span View - Displays information for the
logged in User’s full span of control i.e. n levels down the supervision
hierarchy. This will include records owned by Users and Firms.
Deep Span View - Displays information for the
logged in User’s full span of control i.e. n levels down the supervision
hierarchy. This will include records owned by Users and Firms.
![]() View All - Displays information relating to all
Users within the system. This will include records owned by Users and Firms.
View All - Displays information relating to all
Users within the system. This will include records owned by Users and Firms.
![]() Firm View – Displays information owned by the Firm
currently selected in the Firm Dropdown.
Firm View – Displays information owned by the Firm
currently selected in the Firm Dropdown.
![]() Firm Member View – Displays information owned by
the Users that belong to the Firm currently selected in the Firm Dropdown.
Firm Member View – Displays information owned by
the Users that belong to the Firm currently selected in the Firm Dropdown.
Note: depending on a User’s permissions, they may not have access to all the View Modes described above.
A default view mode selection can be configured for a particular user type using Insight’s Code Links feature, accessible from the Admin area. The default mode will be set when the user logs into the system, and on subsequent logins. The following example links the System Admin user type to the Deep Span view, thus setting Deep Span as the default view mode for System Admin type users:

In a situation where the user does not have permission to use the default view, the system will pick the first available view mode.
User/Firm Selection
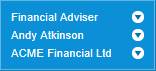 The second widget of the user control panel allows the
currently logged on user to change user position, impersonate a user within
their span of control or change the firm used in conjunction with the two firm
view modes.
The second widget of the user control panel allows the
currently logged on user to change user position, impersonate a user within
their span of control or change the firm used in conjunction with the two firm
view modes.
User Types/ Viewing Other Users
The User Type dropdown displays the User Type of the User Position currently being viewed in Insight.
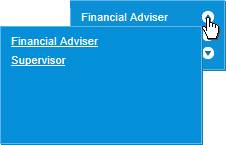 A dropdown list of the different User Types associated
with a User’s User Positions will be displayed on the top line of the User/Firm
Selection Widget. If a User only has one User Position, this will only contain
one User Type.
A dropdown list of the different User Types associated
with a User’s User Positions will be displayed on the top line of the User/Firm
Selection Widget. If a User only has one User Position, this will only contain
one User Type.
To select a different User Type, click the ![]() icon
to the right of the currently selected User Type, then select a new User Type
from the popup list. This may apply a different set of permissions, since
permissions are associated with User Positions rather than the User.
icon
to the right of the currently selected User Type, then select a new User Type
from the popup list. This may apply a different set of permissions, since
permissions are associated with User Positions rather than the User.
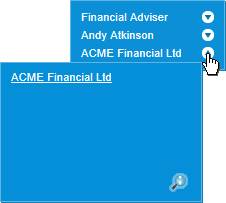
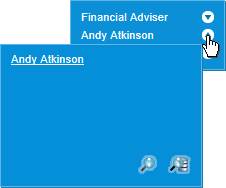 If you are a Supervisor of others, you can also view
information relating to User Positions that you supervise. Click on the
If you are a Supervisor of others, you can also view
information relating to User Positions that you supervise. Click on the ![]() icon
to popup a list of users you can “impersonate”. Initially this list will only
show the name of the logged on user. The
icon
to popup a list of users you can “impersonate”. Initially this list will only
show the name of the logged on user. The ![]() and
and
![]() icons
can be clicked to add another user to the list, searching either by supervision
hierarchy or business hierarchy respectively. Clicking them will launch a
wizard that allows you to search for other User Positions in your span of
control:
icons
can be clicked to add another user to the list, searching either by supervision
hierarchy or business hierarchy respectively. Clicking them will launch a
wizard that allows you to search for other User Positions in your span of
control:
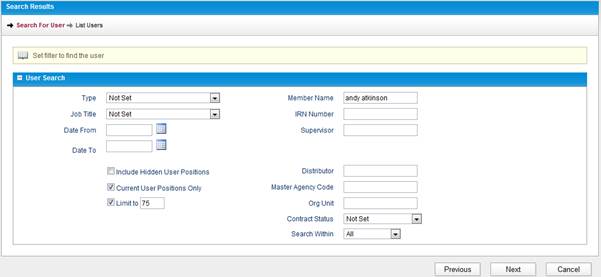
Searching for Users
You can use a number of filters to identify the User you want to select. If you know the name of the User, then the simplest method is to type all or part of their name into the Member Name filter. Another common search may be to use the Type (to search on User Types) or Job Title to search for a certain type of User. When you have entered your search criteria, click Next.
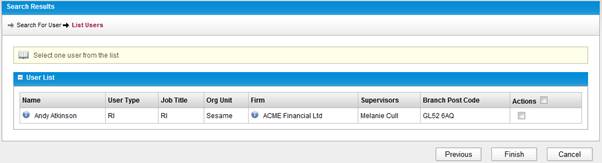
Selecting a User
A list of Users will be returned based on the search criteria entered in the previous step. You must select one (and only one) to continue using the checkbox in the Actions column:
By selecting another User Position in this way, they will then be available in the dropdown list for selection for the duration of the current session in Insight.
When a new user has been added to the popup list, that user will automatically be selected to impersonate, and the user controls panel will turn orange, indicating that you are currently seeing the system through another user. You will now be able to view the selected User Positions data in all of the screens that your permissions allow you access to. The current user can be changed by clicking the name links in the popup list.
Note: Assuming another User’s view like this does not apply their permissions as well, you will still be bound by the permissions associated to your User Positions.
Firms/ Viewing Other Firms
The Firm dropdown displays defaults to the Firm that the logged in User Position currently belongs to.
 Like the User popup list, initially the Firm popup list
will only contain the Firm that the logged in User Position belongs to.
Like the User popup list, initially the Firm popup list
will only contain the Firm that the logged in User Position belongs to.
If a User Position does not belong to a Firm, the popup will be blank.
The Firm is displayed in this popup for information and also works in conjunction with the Firm and Firm Member View Modes which enable you to view information in Insight that belongs to a Firm or the members of a Firm.
Depending on your permissions, it may be possible to select a different Firm that can then be used with the Firm and Firm Member View Modes.
To select a different Firm, click the ![]() icon
to launch a wizard that allows you to search for and select a Firm:
icon
to launch a wizard that allows you to search for and select a Firm:
Searching for Firms
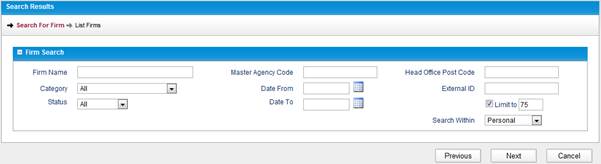
You can use a number of filters to identify the Firm you want to search for. If you know the name of the Firm, then the simplest method is to type all or part of their name into the Firm Name filter. When you have entered your search criteria, click Next.
Selecting a Firm

Alternatively, a list of Firms will be returned based on the search criteria entered in the previous step. You must select one (and only one) to continue using the checkbox in the Actions column.
The selected Firm will be added to the popup list for the duration of the current Insight session.
If you want to switch between Firms already selected in the Firm dropdown, you must click the the firm’s name in the popup list. This Firm can then be used in conjunction with the Firm and Firm Member View Modes.
Links
Provides “always on screen” access to commonly used links, as detailed in the following sections.
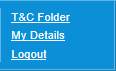
T&C Folder
‘T&C
Folder’ will access an electronic version of an individual’s T&C folder
that presents key information in one place. ‘T&C Folder’ can be accessed
from the ![]() link
at the top of the screen or via the ‘T&C Folder’ link in the User Control
Panel.
link
at the top of the screen or via the ‘T&C Folder’ link in the User Control
Panel.
You can also view another person’s or Firm’s T&C Folder
(if you have permission) by clicking the ![]() icon
in the Actions column on the Span of Control – User Positions screen, or the
icon
in the Actions column on the Span of Control – User Positions screen, or the ![]() icon
in the Span of Control - Firm screen. Additionally, you can access the T&C
Folder from the User Position list screen and the Firm list screen. Only one
T&C Folder can be displayed at a time, therefore selecting different View
Modes will have no effect on the information displayed.
icon
in the Span of Control - Firm screen. Additionally, you can access the T&C
Folder from the User Position list screen and the Firm list screen. Only one
T&C Folder can be displayed at a time, therefore selecting different View
Modes will have no effect on the information displayed.
The User T&C Folder is linked to a User Position record, therefore if a User has multiple User Positions, then they will have multiple T&C Folders (one for each role).
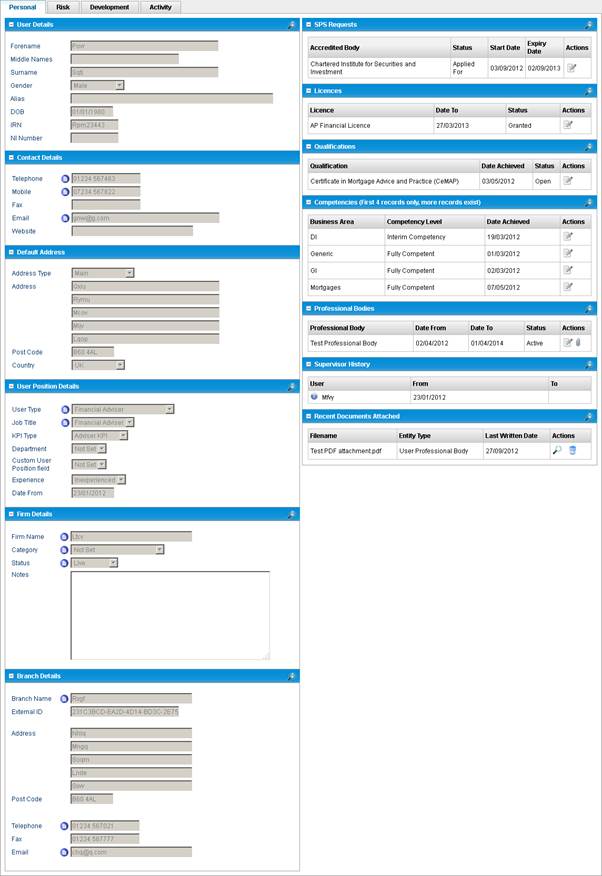
Key information relating to the User Position is displayed at the top of the screen, with colour coding to provide a visual representation of the current risk rating of that individual, if one is available. This screen is displayed for the User T&C Folder:

This top bar of information is always displayed no matter which tab is currently being viewed. It also displays the current Contract Status and the current active Supervisors (of the User Position).
Similar information is displayed for a Firm:

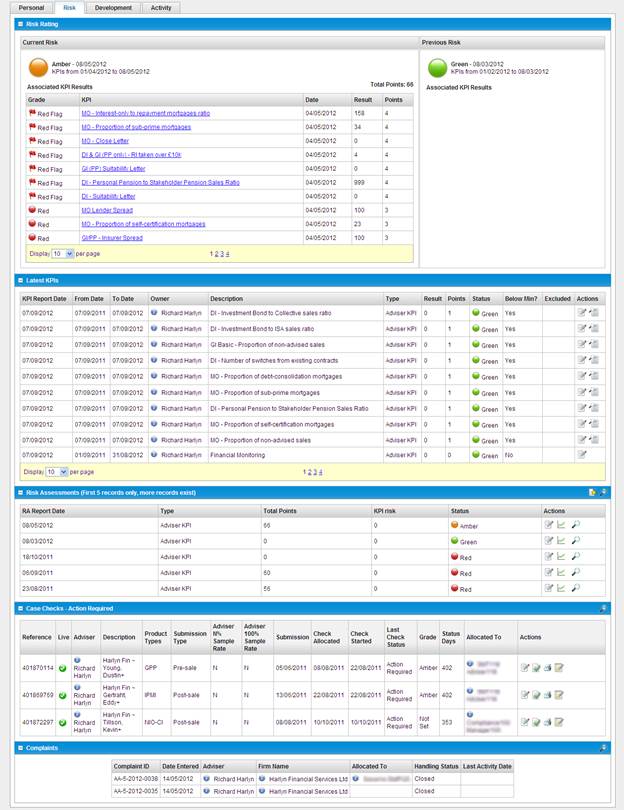
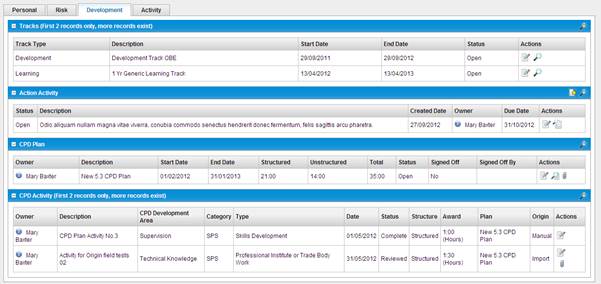
The T&C Folder’s information is spread across four tabs:
![]()
Each tab contains a number of widgets. Each list-based widget will only display a certain number of records. The number of records displayed by widgets in the T&C Folder can be changed in the System Settings by altering the ‘T&C folder lists maximum rows’ setting.
It is normally possible to view the details of records
displayed in the widgets by clicking on the ![]() icon.
Other actions may also be available and will vary between the different record
types displayed.
icon.
Other actions may also be available and will vary between the different record
types displayed.
To access a full list of records in a particular widget,
click the ![]() icon
on the widget header bar. This will display the normal list screen in
Insight. For example, if you click the
icon
on the widget header bar. This will display the normal list screen in
Insight. For example, if you click the ![]() icon
on the Risk Assessments widget, the full Risk Assessment list for the user or
firm whose T&C Folder is being viewed will be displayed. This is useful
when there are more records than can be viewed in the T&C Folder.
icon
on the Risk Assessments widget, the full Risk Assessment list for the user or
firm whose T&C Folder is being viewed will be displayed. This is useful
when there are more records than can be viewed in the T&C Folder.
Each widget can also be collapsed or expanded using ![]() icon
in the top left corner.
icon
in the top left corner.
Note: whilst all the widgets mentioned in the following list exist in the User T&C Folder, only those in bold are displayed in the Firm T&C Folder:
§ Personal –
Displays personal details for the User or Firm whose T&C Folder is being
viewed, including:
User Details, Contact Details, Default Address, User Position Details, Firm Details,
Branch Details, SPS Requests, Licences, Qualifications, Competencies,
Professional Bodies, Supervisor History, Application and Recent
Attached Documents.
§ Risk – Displays a User’s or Firm’s current risk, previous risk, latest KPI results and risk assessments, along with a list of sales case checks that require action and any recent complaints raised against them:
§ Development – Displays currently open tracks, open actions (from the Action Plan), open CPD Plans, and recent CPD Activities:
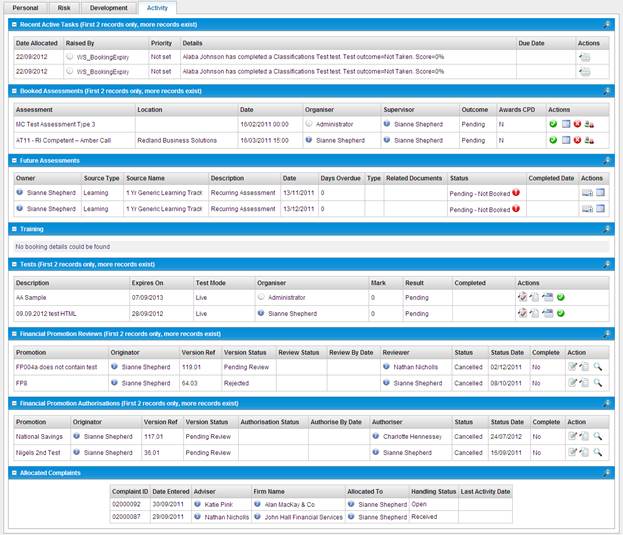
§ Activity – Displays a list of recent active tasks, booked and scheduled assessments, training bookings, tests, financial promotion reviews and authorisations, and complaints allocated to the user for action:
Create Risk Assessment
The Risk Assessment widget on the Risk tab of the T&C
Folder enables you to quickly create a new Risk Assessment by clicking on the
icon ![]() :
:

This will launch the Risk Assessment wizard, but because Insight already knows the User that you want to create the Risk Assessment for, it skips these steps and starts at the date selection step.
Note: if Insight is configured to default the Risk Assessment dates and to skip the date selection step, then the wizard wil skip straight ot the Risk Assessment Details step. The system settings that need to be configured to achieve are:
§ Default risk assessment report date
§ Default KPI report from date
§ Default KPI report to date
§ Skip past risk assessment date step of wizard
Create Action
The Action Activity tab on the Development tab of the
T&C Folder enables you to quickly create a new Action by clicking on the
icon ![]() :
:
This will launch the Action wizard, but because Insight already knows the User that you want to create the Action for, it skips these steps and starts at the Action Plan selection step.
Note: if the User only has one Action Plan, and that Action Plan only contains one Objective, then the wizard will automatically skip straight to the Action Details step.
My Details
‘My
Details’ displays the User Details screen for the logged in User. ‘My Details’
can be accessed from the ![]() link
at the top of the screen.
link
at the top of the screen.
Clicking on the My Details link will display your details in read only mode:
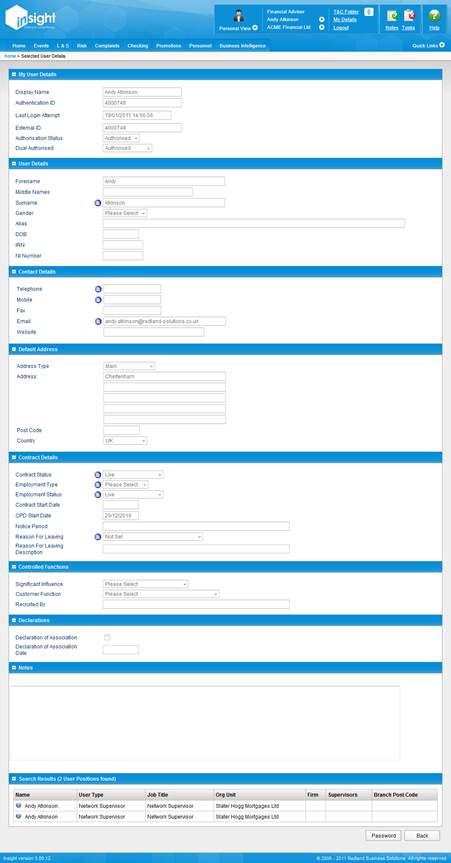
This information is split across a number of sections and includes your contact details, contract details, and a list of your User Positions (or Roles).
Logout
This link logs the user out of system. It ends the current user session before redirecting to the Insight log in page.
Notes & Tasks

These two links provide quick access to any context sensitive notes or tasks stored in the system. The following two sections discuss them in more detail.
Add/Edit Related Internal Notes
Internal Notes can be added to certain record types in Insight and used to record extra information and/or Quality Assurance processes.
When you are viewing certain record types in Insight, you may have access to (depending on your permissions) and Internal Notes icon.

This icon will be displayed in the top right of Insight,
either as ![]() ,
if the currently selected record currently has no Internal Notes currently
associated with it, or
,
if the currently selected record currently has no Internal Notes currently
associated with it, or ![]() if
Internal Notes have already been added to this record.
if
Internal Notes have already been added to this record.
Internal Notes can be added to the following record types in Insight:
§ Assessment Bookings
§ Actions
§ Complaints
§ Sales Case Checks
§ Financial Promotion Versions
§ Financial Promotion Individual Authorisations
§ Financial Promotion Individual Reviews
You must be in the details screen for each of the above entities in order to see the Internal Notes icon.
When the ![]() icon
is clicked, the Internal Notes will be displayed as a popup:
icon
is clicked, the Internal Notes will be displayed as a popup:

This displays all Internal Notes associated with the currently open record.
The following information is displayed for each Internal Note:
§ Created Date – the date the Internal was created.
§ Created By – the name of the User that created the Internal Note.
§ Note Type – the type of Internal Note. These are configurable and will therefore differ between clients.
§ Outcome – the outcome of the Internal Note if it is a QA note. These are configurable and will therefore differ between clients.
§ QA Cycle – the QA cycle number if it is a QA note.
For each Internal Note, it is possible to:
§ Edit Note Details ![]() -
View the details of an Internal Note.
-
View the details of an Internal Note.
§ View Tasks Linked to Note
![]() –
View a list of any Tasks that are associated with the Internal Note (and also
add new Tasks to the Note).
–
View a list of any Tasks that are associated with the Internal Note (and also
add new Tasks to the Note).
To create a new Internal Note, click the ![]() button.
button.
To return to the currently open record and close the popup, click the ![]() button.
button.
To view all Internal Notes that have been added in Insight across all records, you can use the Internal Notes screen.
Adding Internal Notes
To create a new Internal Note, click the Add button whilst in the Internal Notes popup list.
This will display the Internal Details screen:
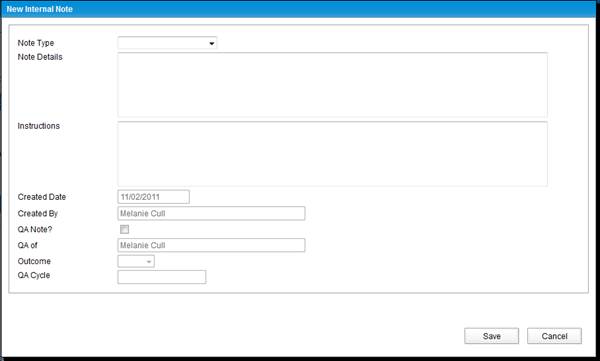
The following information can be specified when creating an Internal Note:
§ Note Type – a dropdown list that is client configurable and specified the type of Note being added. This is optional.
§ Note Detail – a large free-text field that can be used to describe the details of the Internal Note. This is optional.
§ Instructions – a large free-text field that can be used to describe any instructions that need to be carried out by the owner of the record to which the Internal Note applies. This is optional.
§ Created Date – the date the Internal Note was created. This is read only and will default to today.
§ Created By – the name of the User that added the note. This is read only and will default to the name of the logged in User.
§ QA Note? – a checkbox that indicates if the internal note is related to QA or not. If this is checked then the Outcome and QA Cycle fields will become editable, if not, they will be read only (since these fields are only relevant to QA Internal Notes).
§ QA Of – a text field that will be defaulted by the Insight when the QA Note? checkbox is selected. This will default to different Users depending on the record type to which the Internal Note is being added:
o Assessment Bookings – the Event Supervisor (if there is no Event Supervisor then it will default to the Event Organiser).
o Sales Case Checks – the Sales Case Check Owner.
o Action Plan Actions – the Internal Owner of the Action (if there is not Internal Owner it will be left blank).
o Financial Promotion Versions – the user who, at the time the note is created, is Owner of the Financial Promotion record to which the version is linked.
§ QA Outcome – the outcome of the Internal Note if it is a QA note. These are configurable and will therefore differ between clients. This is optional.
§ QA Cycle – a free-text box that can be used to record which cycle of QA it relates to. This is optional.
To create the Internal Note, click the Save button. You will be returned to the Internal Note popup list screen with the new Internal Note displayed at the top of the list.
Note: as Internal Notes can be edited / created entirely within the popup screen, it is not necessary to save any edits made to the underlying record first, you will be returned the record after closing the popup, and any unsaved edits will still be present.
To return to the currently open record and close the popup,
click the ![]() button.
button.
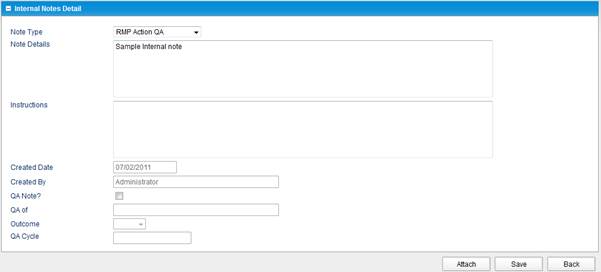
Editing Internal Notes
To view or edit the details of an Internal Note, click on
the ![]() icon
against the relevant Internal Note in the Internal Notes popup list.
icon
against the relevant Internal Note in the Internal Notes popup list.
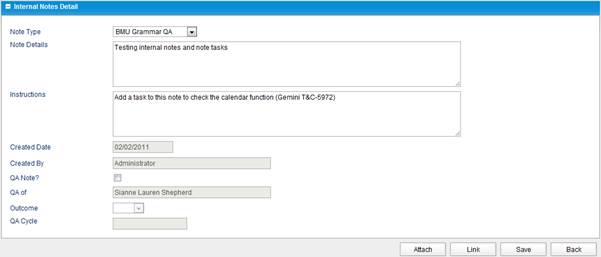
This will open the Internal Notes Detail screen:
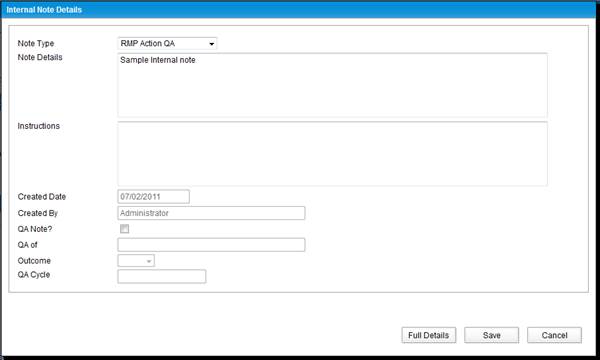
The following information can be specified when editing an Internal Note:
§ Note Type – a dropdown list that is client configurable and specified the type of Note being added.
§ Note Detail – a large free-text field that can be used to describe the details of the Internal Note.
§ Instructions – a large free-text field that can be used to describe any instructions that need to be carried out by the owner of the record to which the Internal Note applies.
§ Created Date – the date the Internal Note was created. This is read only.
§ Created By – the name of the User that added the note. This is read only.
§ QA Note? – a checkbox that indicates if the internal note is related to QA or not. If this is checked then the Outcome and QA Cycle fields will become editable, if not, they will be read only (since these fields are only relevant to QA Internal Notes).
§ QA Of – displays the User’s name who is the target of the QA when the Internal Note is a QA Note. This is read only.
§ QA Outcome – the outcome of the Internal Note if it is a QA note. These are configurable and will therefore differ between clients. This is optional.
§ QA Cycle – a free-text box that can be used to record which cycle of QA it relates to. This is optional.
To save any changes made to the Internal Note, click the Save button and you will be returned to the Internal Note popup list screen.
If you click on the Full Details button whilst editing an Internal Action, you will be taken to a non-popup version of the Internal Note Details screen. Since this will navigate away from the source record from which you launched the Internal Notes popup, Insight will first ask if you’re sure in order to prevent any unwanted data loss (i.e. in sales case you had made unsaved edits to the underlying source record):
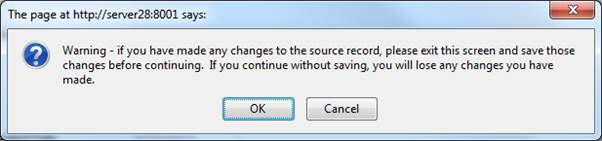
Clicking Cancel on the above message will return you to the Internal Note Details screen (popup version).
Clicking OK will navigate to the non-popup version of the Internal Notes Detail screen:
View Tasks Linked to an Internal Note
You can add ad-hoc Tasks to Internal Notes via the Internal Note popup screen:

To do so, click on the ![]() icon
against the Internal Note that you want to add Task to.
icon
against the Internal Note that you want to add Task to.
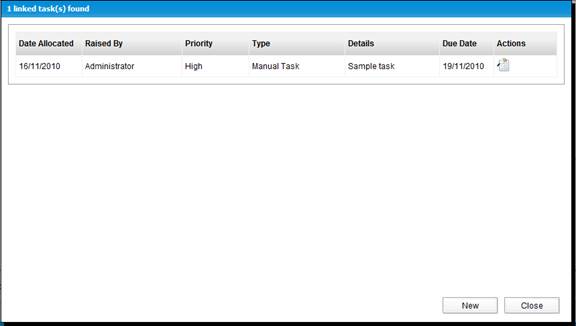
This will open the Task popup list and will display a list of all Tasks that are associated with the Internal Note:
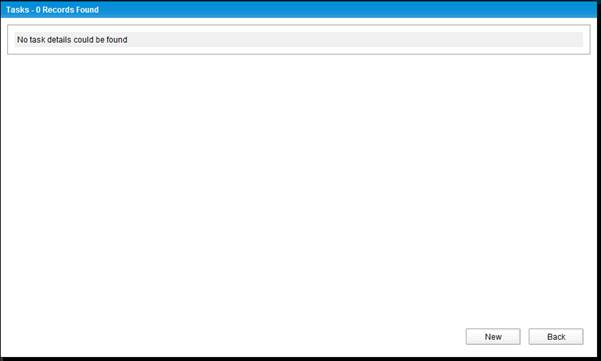
Note: the Task list displays both ad-hoc Tasks and those created automatically by Workflow Activity.
To create a new Task linked to the Internal Note, click the New button.
This will launch the Create Task wizard.
Add/Edit Related Tasks
Ad-hoc Tasks can be added to a number of different record types in Insight. These Tasks will be linked to the source record and be available in both the Task list and from the source record.
When you are viewing certain record types in Insight, you may have access to a Tasks icon (depending on your permissions).

This icon will be displayed in the top right of Insight,
either as ![]() ,
if the currently selected record currently has no related Tasks, or
,
if the currently selected record currently has no related Tasks, or ![]() if
Tasks have already been added to this record.
if
Tasks have already been added to this record.
Note: if Workflow Activities have been triggered as a result of records being added or updated, then Tasks may be linked to the record automatically.
Tasks can be added to any of the following record types in Insight:
§ Applications
§ Application Activities
§ Application Approvals
§ Tracks
§ Assessment Bookings
§ Competencies
§ Licences
§ Qualifications
§ Actions
§ Test Bookings
§ Complaints
§ Sales Cases
§ Sales Case Checks
§ KPI Results
§ Risk Assessments
§ Financial Promotions
§ Financial Promotion Versions
§ Financial Promotion Individual Authorisations
§ Financial Promotion Individual Reviews
§ Users
§ User Position Sampling Records
§ Internal Notes
You must be in the details screen for each of the above records in order to see the Tasks icon.
When the ![]() icon
is clicked, the Tasks will be displayed as a popup:
icon
is clicked, the Tasks will be displayed as a popup:
This displays all Tasks associated with the currently open record, regardless of whether they have been created manually (i.e. ad-hoc Tasks), or automatically via Workflow Activities and regardless of the current View Mode.
Creating Tasks
To create a new ad-hoc Task, click on the ![]() button
at the bottom of the screen:
button
at the bottom of the screen:
This will launch the Create Task wizard:
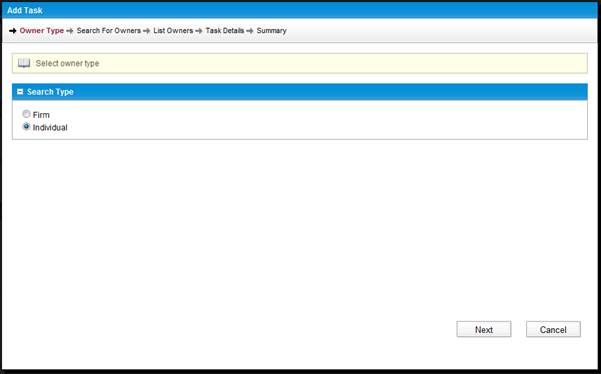
Step 1 – Create Task for…
The first step requires you to select whether you want to create a Task for a Firm or an Individual (i.e. a User):
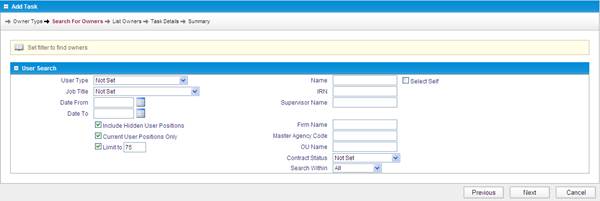
Step 2 – Search for Owner
The owner type selected in Step 1 will determine the nature of the search screen in Step 2. If ‘Individual’ is selected then this step will ask you to search for Users, if ‘Firm’ is selected then you will be required to search for Firms:
Searching for Users
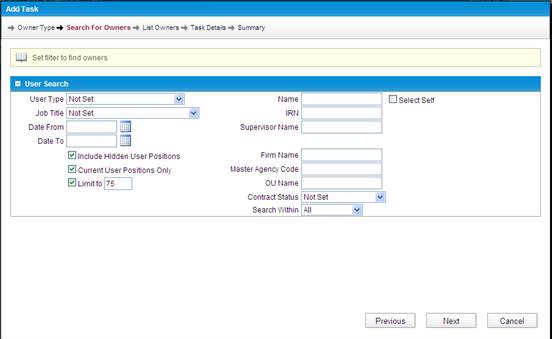
You can use a number of filters to identify the User you want to create the Task for. If you know the name of the User, then the simplest method is to type all or part of their name into the Member Name filter. Another common search may be to use the Type (to search on User Types) or Job Title to search for a certain type of User. When you have entered your search criteria, click Next.
Searching for Firms
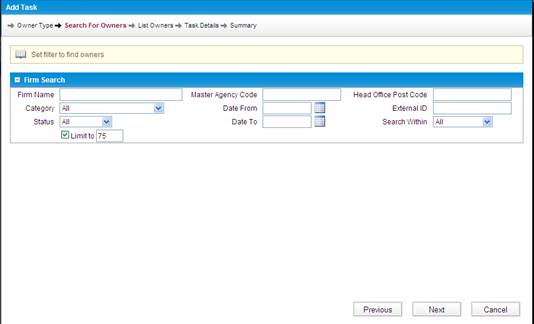
Alternatively, you can use a number of filters to identify the Firm you want to create the Task for. If you know the name of the Firm, then the simplest method is to type all or part of their name into the Firm Name filter. When you have entered your search criteria, click Next.
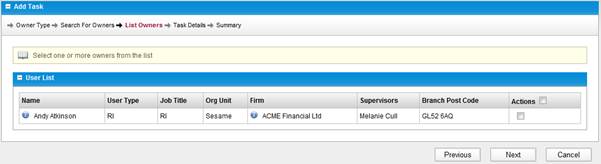
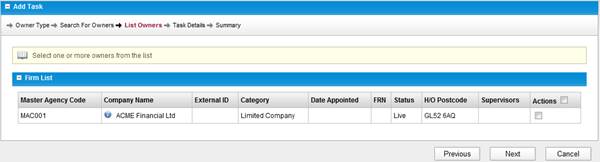
Step 3 – Select Owner
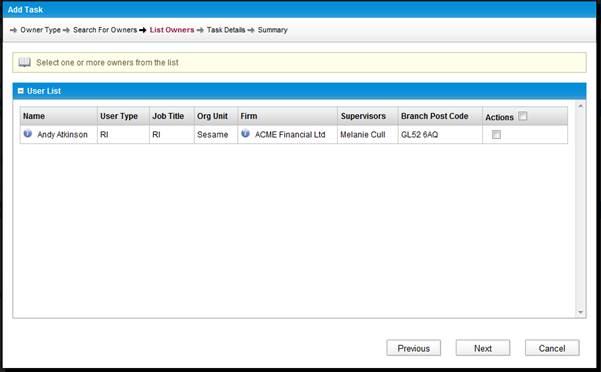
Depending on what has been searched for in the previous step, you must select either a User or a Firm in this step:
Selecting a User
A list of Users will be returned based on the search criteria entered in the previous step. You must select one (and only one) to continue using the checkbox in the Actions column.
Selecting a Firm
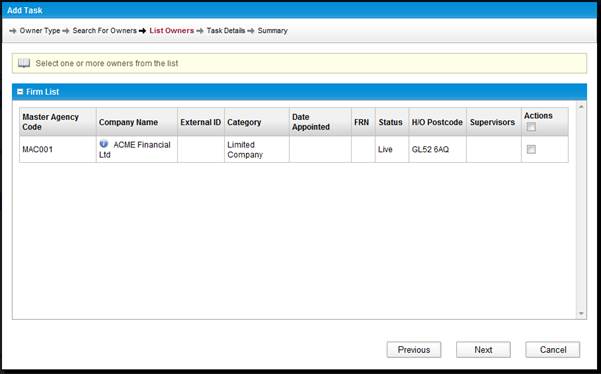
Alternatively, a list of Firms will be returned based on the search criteria entered in the previous step. You must select one (and only one) to continue using the checkbox in the Actions column.
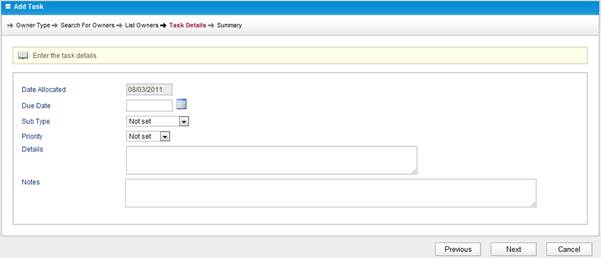
Step 4 – Task Details
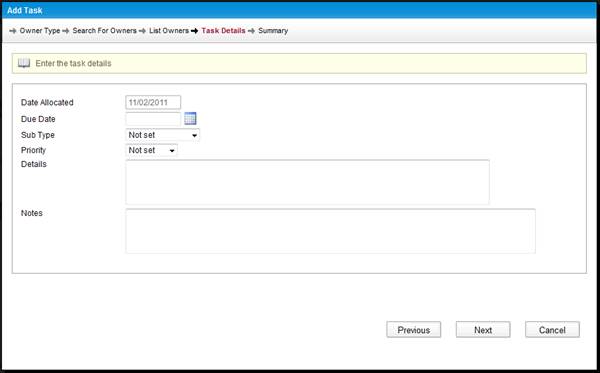
In this step, the details of the Task can be entered. The following information can be entered:
§ Date Allocated – the date that the Task was allocated to the Task owner. This defaults to today’s date and cannot be edited.
§ Due Date – the date that the Task should be completed by. This is mandatory.
§ Sub Type – the type of ad-hoc Task being created. This list is client configurable and will therefore differ between clients.
§ Priority – the priority of the Task. This list is client configurable and will therefore differ between clients.
§ Details – the details of the Task to be carried out.
§ Notes – audited notes that will appear in the Task Details.
Click Next when the Task Details have been entered.
Step 5 – Summary
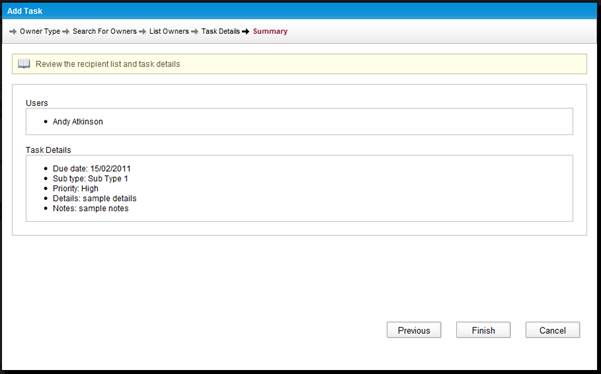
This step enables you to review what you have entered in the previous steps.
Click Finish when you are happy to proceed and create the Task. You will be returned to the Task list popup, with the newly created Task now visible in the list:
Note: as Tasks can be edited/created entirely within the popup screen, it is not necessary to save any edits made to the underlying record first, you will be returned the record after closing the popup and any unsaved edits will still be present.
To return to the currently open record and close the popup,
click the ![]() button.
button.
Editing Tasks
To view and/or edit the details of a Task, click the ![]() icon
against the relevant Task:
icon
against the relevant Task:

This will open the Task Details screen:
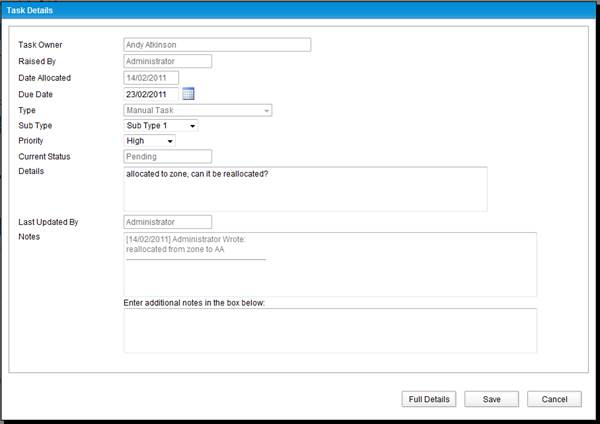
The following information can be viewed/edited:
§ Task Owner – the owner of the Task (can be either a User or a Firm). This is read only in this screen and can only be changed by Reallocating the Task. This is an audited field.
§ Raised By – the name of the User that raised the Task. This cannot be edited. This is an audited field.
§ Date Allocated – the date that the Task was allocated to the Task owner. This cannot be edited. This is an audited field.
§ Due Date – the date that the Task should be completed by. This can be edited and is mandatory. This is an audited field.
§ Type – the read-only type of Task which will either be:
o Manual – the Task has been created manually as an ad-hoc Task.
o Workflow – the Task has been created automatically by Insight as a result of Workflow configuration.
§ Sub Type – the sub-type of ad-hoc Task being created. This list is client configurable and will therefore differ between clients. This is editable. This is an audited field.
§ Priority – the priority of the Task. This list is client configurable and will therefore differ between clients. This is editable. This is an audited field.
§ Current Status – the status of the Task. This can be either ‘Pending’ or ‘Complete’. It is read only since Tasks are completed using either the Complete button at the bottom of the Task Details (non-popup version) or the Complete icon on the Task List. This is an audited field.
§ Details – the details of the Task to be carried out.
§ Last Updated By – the name of the User that last edited the Task.
§ Notes – audited notes that will appear in the Task Details.
Note: you will only be able to edit the Task if you are the Task Owner, of would normally be able to browse to and edit the Task via the Task List, otherwise, you will see the following message and the Task will be read only:
![]()
Note: If the Task has been allocated to the default Task Owner, you will see the following message. This is a prompt that you may want to reallocate this Task to the relevant User. Upon reallocation, this message will disappear.
![]()
To save the changes made to the Task, click the Save button. This will return you to the Task list popup.
If you want to complete or reallocate the Task, then you must either use the non-popup version of the Task Details screen or use the relevant icons on the Task List.
To view the Task Details in the non-popup version of
the screen, click the ![]() button.
A confirmation message will be displayed:
button.
A confirmation message will be displayed:
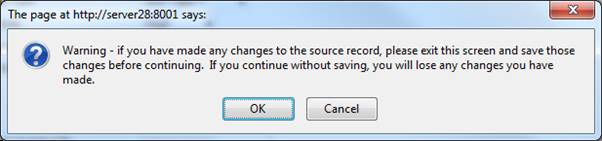
Since the non-popup version of the Task Details will take away from the source record that you were viewing, you must confirm that you are happy to lose any unsaved data on that record. If you have not made any edits, or you are happy to lose any edits you have made, click the OK button, otherwise click Cancel and then save the record first.
If you click OK, the non-popup version of the Task Details screen will be displayed. From this screen, you can reallocate and complete Tasks.
Help

This link provides access to context sensitive help documentation.
Quick Links
Quick Links are always accessible via the link below the User Control Panel.

The following Quick Links are available:
§ T&C Folder – Links to the T&C Folder.
§ Events – Links to the Events list screen (in the Events menu).
§ Tracks – Links to the Tracks screen (in the Learning & Supervision menu).
§ Competencies – Links to the Competencies screen (in the Learning & Supervision menu).
§ Qualifications – Links to the Qualifications screen (in the Learning & Supervision menu).
§ Licenses – Links to the Licenses screen (in the Learning & Supervision menu).
§ Sales Cases – Links to the Sales Case List screen (in the Checking menu).
§ Cases – Links to the Open Case List screen (in the Cases menu).
§ CPD – Links to the CPD Activities screen (in the CPD menu).
§ Actions – Links to the Actions List (in the Learning & Supervision menu).
§ Documents – Links to the Documents screen, see “Document Manager” below for more information.
§ Internal Notes – Links to the Internal Notes screen, see “Internal Notes” below for more information.
Note: the actual Quick Links available to a User will be dependent upon their permissions, for example, to view the ‘Competencies’ Quick Link, the User must have permission to view the Competencies list.
Tool Tips
Insight uses Tooltips to help explain the function of certain buttons and icons. To view a tooltip, hover over the icon or button.
Column Sorting
The User is able to sort list screen results in one of two ways, depending on the list screen being used.
The first style list screen has a results list that can be re-ordered by clicking on the column heading. One click will sort the data in ascending order, and a second click will sort the data in descending order.
Note: certain columns cannot be used to re-order lists, such as those that contain Action icons.
The second style list screen has a results list which includes two selection controls and a Sort button. The first selection control contains a list of fields on which the results can be sorted, and the second gives a choice of ascending or descending order.
![]()
Once selections have been made using these two controls, these will be applied to the results by clicking the Sort button.
List Filters
Throughout
Insight, the User has the ability to filter the results that are displayed on
list screens. When a filter has been applied, the User will see the text ![]() on
the filter toolbar. If the filter is not displayed, click on the
on
the filter toolbar. If the filter is not displayed, click on the ![]() icon
in the top left of the filter toolbar or on the “Filter in Progress” text.
icon
in the top left of the filter toolbar or on the “Filter in Progress” text.
The icons on the list filter toolbar ![]() allow
the User to:
allow
the User to:
§ Export to Excel
![]() -
exports the current data set to Excel (in .csv format), this will ignore
paging. Upon clicking this icon, a link will be displayed after a short pause
-
exports the current data set to Excel (in .csv format), this will ignore
paging. Upon clicking this icon, a link will be displayed after a short pause ![]() that
must be clicked on to view the document. If you have MS Excel installed on
your computer, then it will be possible to view the resulting file directly in
Excel. You can also save the file to your computer.
that
must be clicked on to view the document. If you have MS Excel installed on
your computer, then it will be possible to view the resulting file directly in
Excel. You can also save the file to your computer.
Important Note: there are settings which determine whether the export
will be available immediately or generated in the background for download at a
later time, based on the number of records being exported. This is to prevent
potential system timeouts if a user attempts to export a very large list.
§ Turn on/off paging
![]() -
displays results in pages or in one list. The number of results displayed on
each page is set to 10, it is possible to change this for the current set of
results returned by selecting a different value in the dropdown. You can also
switch between pages by clicking on the page controls.
-
displays results in pages or in one list. The number of results displayed on
each page is set to 10, it is possible to change this for the current set of
results returned by selecting a different value in the dropdown. You can also
switch between pages by clicking on the page controls.
Page controls on the single filter style list screen:
![]()
Page controls on the dual Basic/Advanced style list screen:
![]()
Important note: “Turn on/off paging” is not available on list screens with
a dual-style filter.
§ Clear Filter ![]() -
clears all filters back to the default values and shows all results based on
the currently selected View Mode.
-
clears all filters back to the default values and shows all results based on
the currently selected View Mode.
§ Show/Hide Advanced
Filter![]() – shows or hides additional filter fields that are not available on the default
Basic filter.
– shows or hides additional filter fields that are not available on the default
Basic filter.
§ Filter List Using
Selections ![]() -
once the required filters have been entered, refresh the list by clicking this
icon. You can also apply a filter by pressing the Enter key when viewing a
list.
-
once the required filters have been entered, refresh the list by clicking this
icon. You can also apply a filter by pressing the Enter key when viewing a
list.
Dashboards
Each module within Insight has an associated dashboard. Each dashboard displays a summary of relevant MI information in the form of tables or charts which can be drilled down from, to show either a sub-dashboard or a detailed list. Dashboards are displayed by selecting the Dashboard option from the menu related to the required module.
Insight contains the following Dashboards:
§ Events
§ Learning & Supervision
§ CPD
§ Training
§ Testing
§ Risk
§ Complaints
§ Checking
§ Promotions
§ Business Intelligence
Dashboards contain a number of widgets that use charts, graphs, or tables to show information which is generally aggregated from records relating to the Dashboard’s module in Insight.
Each Dashboard works with in a number of different View Modes and most widgets support drilldown into either a sub-dashboard or list screen for further data analysis.
Each Dashboard listed above is described in detail in the appropriate User Guide for that module.
Dashboard Caching
Dashboard data is cached the first time you visit each Dashboard on a daily basis.
Dashboard data is cached for:
§ The logged in User
§ The currently selected User (which may be different to the logged in User)
§ The currently selected View Mode
§ Any filters that are applied to a Dashboard
For example, if Bill logs in for the first time on any given day and visits the Events Dashboard in Personal View Mode, then Insight will cache the data for Bill on the Events Dashboard in Personal View. If Bill then switches the same dashboard to View All, then Insight will cache the same dashboard in View All mode.
If Bill then selects another User to view and enters a Dashboard, Insight will cache the Dashboard data for the selected User as well.
When Insight is caching the data, the Dashboards will take longer to generate. Once cached, the Dashboards will be based on the cached data rather than real-time until either:
§ The User logs in the following day;
§ The User manually refreshes the entire Dashboard (using the Refresh button at the bottom of each Dashboard); or
§ The User manually
refreshes an individual widget on a Dashboard (using the ![]() button
at the bottom of each widget). Note: some widgets have an Update button
instead of a refresh button, but this does the same thing.
button
at the bottom of each widget). Note: some widgets have an Update button
instead of a refresh button, but this does the same thing.
Dashboard caching is used in order to keep the Dashboard’s performance at appropriate speeds.
My Details
Viewing Audit Trails
When viewing this screen, where the ![]() icon
appears to the left of a field, this indicates that an audit trail of changes
is available for that field. Clicking on the
icon
appears to the left of a field, this indicates that an audit trail of changes
is available for that field. Clicking on the ![]() icon
will display the audit trail for that field:
icon
will display the audit trail for that field:
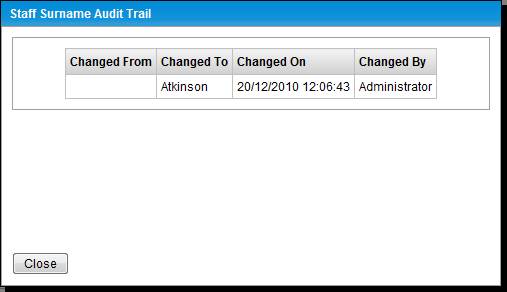
Each change to the field will be displayed as a record in the Audit Trail. This presents the following information:
§ Changed From – the previous value of the field. This will be blank if the field had no previous value.
§ Changed To – the value to which the field was changed.
§ Changed On – the date and time that the field was updated.
§ Changed By – the name of the User that made the change.
You will see the ![]() icon
against numerous fields on many screens in Insight.
icon
against numerous fields on many screens in Insight.
Changing Your Password
A User is able to change their password by selecting the ![]() button
at the bottom of the screen:
button
at the bottom of the screen:
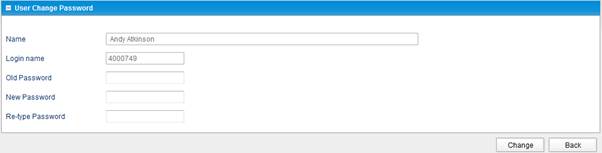
The User will be required to enter their old password first, followed by a new password which must also be confirmed.
Administration
The
Administration area of Insight is accessed from the ![]() icon
and is used to configure Insight. This will only be available to certain Users
who have administration permissions.
icon
and is used to configure Insight. This will only be available to certain Users
who have administration permissions.
Please click on Help whilst in the Administration area for help in this area.
Internal Notes
The Internal Notes list is a central list that displays all Internal Notes that have been added in Insight.
This list is accessed via the “Internal Notes” link in the Quick Links popup:
Note: this screen always display all records regardless of the currently selected View Mode.
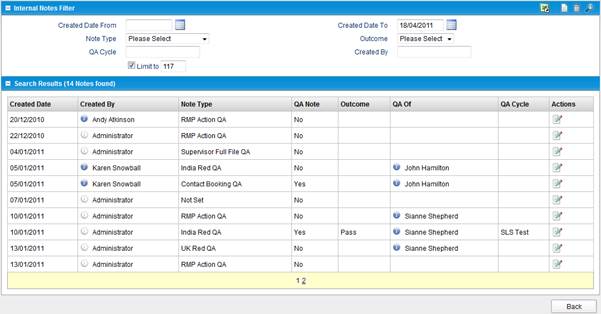
For each Internal Note, it is possible to:
§ Edit Note Details
![]() –
to view and edit the details of the Internal Note. It is also possible to add
ad-hoc Tasks from this screen.
–
to view and edit the details of the Internal Note. It is also possible to add
ad-hoc Tasks from this screen.
§ View Link Entity
Details ![]() –
this will open the source record to which the Internal Note is linked.
–
this will open the source record to which the Internal Note is linked.
Note: it is not possible to create new Internal Notes from this screen.
Editing Internal Notes
To view or edit the details of an Internal Note, click on
the ![]() icon
against the relevant Internal Note in the Internal Notes list.
icon
against the relevant Internal Note in the Internal Notes list.
This will open the Internal Notes Detail screen:
The following information can be specified when editing an Internal Note:
§ Note Type – a dropdown list that is client configurable and specified the type of Note being added.
§ Note Detail – a large free-text field that can be used to describe the details of the Internal Note.
§ Instructions – a large free-text field that can be used to describe any instructions that need to be carried out by the owner of the record to which the Internal Note applies.
§ Created Date – the date the Internal Note was created. This is read only.
§ Created By – the name of the User that added the note. This is read only.
§ QA Note? – a checkbox that indicates if the internal note is related to QA or not. If this is checked then the Outcome and QA Cycle fields will become editable, if not, they will be read only (since these fields are only relevant to QA Internal Notes).
§ QA Of – displays the User’s name who is the target of the QA when the Internal Note is a QA Note. This is read only.
§ QA Outcome – the outcome of the Internal Note if it is a QA note. These are configurable and will therefore differ between clients. This is optional.
§ QA Cycle – a free-text box that can be used to record which cycle of QA it relates to. This is optional.
To save any changes made to the Internal Note, click the Save button and you will be returned to the Internal Note popup list screen.
Clicking on the Link button will open the source record to which the Internal Note is linked.
Document Manager
The Document Manager enables the User to view a list of files that have been attached to a particular person or entity within Insight. It is essentially a central repository for all files that have been uploaded by Users.
Document Manager is accessed via the “Documents” link in the Quick Links popup:

When in the Document Manager and viewing files, a number of actions are possible:
§ View File ![]() –
this will launch the attached file for viewing. You will be able to download
the file or open it (providing you have the required viewing application
installed).
–
this will launch the attached file for viewing. You will be able to download
the file or open it (providing you have the required viewing application
installed).
§ Add File to this
Entity ![]() –
allows you to browse for and add another file to the selected record without having
to browse to that record first.
–
allows you to browse for and add another file to the selected record without having
to browse to that record first.
§ Delete File ![]() –
allows you to delete the selected file from the record to which it is attached.
–
allows you to delete the selected file from the record to which it is attached.
§ View/Edit Parent
Entity ![]() –
allows you to open the record that the file is linked to e.g. CPD record or
Assessment Booking.
–
allows you to open the record that the file is linked to e.g. CPD record or
Assessment Booking.
User/Firm Details Popup
Insight contains numerous list screens that display a User’s or Firm’s name. Wherever this occurs, you will an icon next to their name which can be clicked to view more details about the User or Firm.
An example of a User being displayed in a list is shown below:

One of four icons will be displayed next to the name:
§ Live ![]() -
The User has a Contract Status of ‘Live’, or the Firm has a Status of ‘Live’.
-
The User has a Contract Status of ‘Live’, or the Firm has a Status of ‘Live’.
§ Not Live ![]() -
The User or Firm have a Contract Status/Status of anything but ‘Live’.
-
The User or Firm have a Contract Status/Status of anything but ‘Live’.
§ Live and Dual
Authorised ![]() -
The User has a Contract Status of ‘Live’ and the Dual Authorised field is set
to ‘Dual-Authorised’ (this indicates that the User works at multiple Firms
concurrently).
-
The User has a Contract Status of ‘Live’ and the Dual Authorised field is set
to ‘Dual-Authorised’ (this indicates that the User works at multiple Firms
concurrently).
§ Not Live and Dual
Authorised ![]() -
The User or Firm have a Contract Status/Status of anything but ‘Live’ and the
Dual Authorised field is set to ‘Dual-Authorised’.
-
The User or Firm have a Contract Status/Status of anything but ‘Live’ and the
Dual Authorised field is set to ‘Dual-Authorised’.
Hovering over the icon will display the specific Contract Status or Status of the User or Firm.
Clicking on the icon next to a User name will display more details about that User:
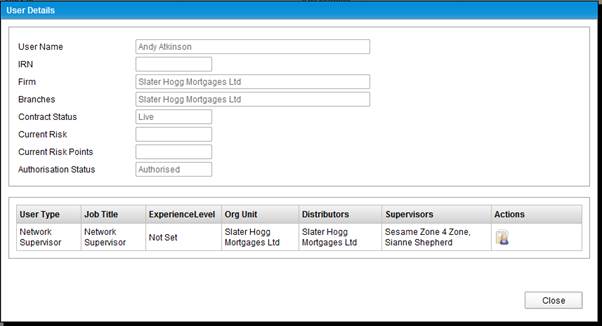
This includes information relating to their current risk and
the User Positions that they hold. You can view the T&C Folder for each
User Position by clicking on the ![]() icon.
icon.
Clicking on the icon next to a Firm name will display more details about that Firm:
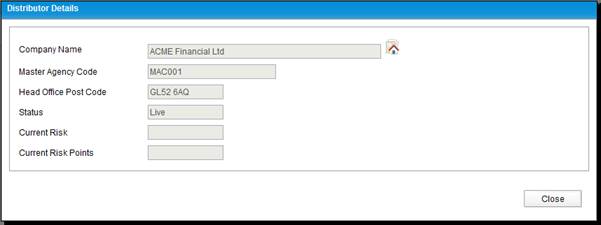
To view a Firm’s T&C Folder, click on the ![]() icon
next to the Company Name field.
icon
next to the Company Name field.
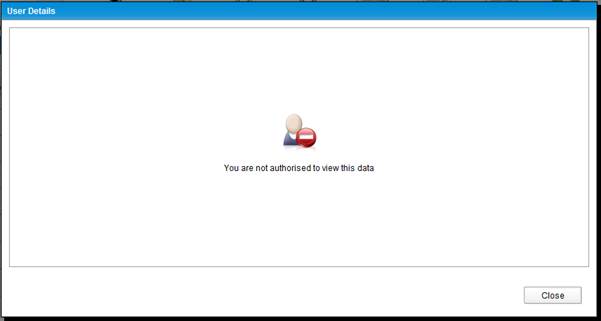
Before Insight displays any details on the popup, it will first perform a check to ensure you are allowed to view the details of that User or Firm. This check is carried out based on whether you could validly view information for that User via the View Modes in Insight.
For example, if you have View All mode then you can view User/Firm information for any User/Firm in Insight. If you only have Shallow Span view then you will only be able to view information for Users and Firms that you directly supervise.
If you are not allowed to view the information for a User or Firm, you will see the following screen when you click on the icon:
Home Page
The Home Page is a Dashboard that you will see each time you launch Insight.
If this is the first time you have used Insight, it is recommended to read Navigation and Insight Concepts first.
The Home Page contains the following widgets:
§ Task List - to view the most recently allocated Tasks.
§ Events (On Track and Off Track) – a summary of Events that have been allocated to the User.
§ Sales Cases with Action Required – a summary of Sales Cases submitted by the User that require some action due or taken in response to a checking query.
Note: the widgets available on the Home Page may differ depending on the permissions of the User.
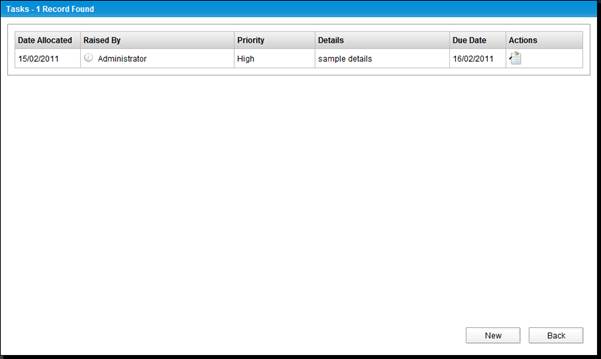
Task List
The Task List on the Home Page is a to-do list that will only display Tasks for the logged in User, it is unaffected by the View Mode.

It is limited to display only the 10 most recently allocated
Tasks. If the User wants to view more Tasks then they can click on the ![]() link.
When viewing the main Task List (by clicking on
link.
When viewing the main Task List (by clicking on![]() ),
it is possible to filter the Tasks and also view Tasks using the
different View Modes.
),
it is possible to filter the Tasks and also view Tasks using the
different View Modes.
Tasks can be created as a result of configurable Workflow,
or they can be created manually as ad-hoc Tasks. Workflow Tasks will appear
automatically on User’s Tasks lists when the relevant conditions are triggered
in Insight. Ad-hoc Tasks can be created by clicking on ![]() when
viewing all Tasks.
when
viewing all Tasks.
Note: It is also possible to create Ad-hoc Tasks and link them to certain source records in Insight. To do this you must create the via the Tasks popup screen with the source record that you wish to link to open. See Add/Edit Related Tasks.
Various actions can be performed on Tasks in the Task list:
§ View Task ![]() –
this will display the Task details so that you can view or make amends to the
Task.
–
this will display the Task details so that you can view or make amends to the
Task.
§ Complete ![]() –
this will complete the task.
–
this will complete the task.
§ Reallocate ![]() –
this will reallocate the Task to a new owner.
–
this will reallocate the Task to a new owner.
§ Link ![]() –
this will open the record that the Task is linked to. This icon will only be
available for Tasks that are linked to a source record (only Tasks created from
Workflow can be linked to source records). The tooltip for the link is
configurable in the Workflow for each task.
–
this will open the record that the Task is linked to. This icon will only be
available for Tasks that are linked to a source record (only Tasks created from
Workflow can be linked to source records). The tooltip for the link is
configurable in the Workflow for each task.
§ Workflow Trail
![]() –
this will display a list of all linked Tasks that have been created within the
same Workflow. For long workflows this provides an audit trail back through
the workflow.
–
this will display a list of all linked Tasks that have been created within the
same Workflow. For long workflows this provides an audit trail back through
the workflow.
§ Creating Tasks
– if you are viewing the All Tasks list (accessed by clicking on ![]() on
the Task List widget), you will also be able to create new Tasks by clicking on
the New button.
on
the Task List widget), you will also be able to create new Tasks by clicking on
the New button.
Tasks that are overdue will display ![]() in
the first column of the Task list, hovering over the icon will display a
tooltip that tells you by how many days the Task is overdue.
in
the first column of the Task list, hovering over the icon will display a
tooltip that tells you by how many days the Task is overdue.
Note: Access to some of the above actions is controlled by permissions and may not be available to all Users.
Note: When linking to sales quality Sales Cases or Sales Case Checks, Insight will perform a further check to ensure you are allowed to see the details. This is based on the view permissions you have and your position in the supervision hierarchy. This is designed to prevent other people accessing Sales Case/Sales Case Check details that they shouldn’t be able to see when the Task has been incorrectly allocated/reallocated.
Editing Tasks
To edit a Task, click the ![]() icon
for the relevant Task in the Task List. This will display the Task Details
screen:
icon
for the relevant Task in the Task List. This will display the Task Details
screen:
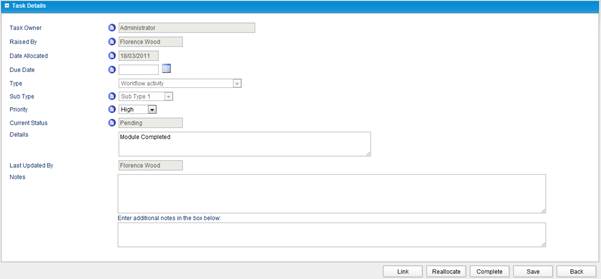
The following information can be viewed/edited:
§ Task Owner – the owner of the Task (can be either a User or a Firm). This is read only in this screen and can only be changed by Reallocating the Task. This is an audited field.
§ Raised By – the name of the User that raised the Task. This cannot be edited. This is an audited field.
§ Date Allocated – the date that the Task was allocated to the Task owner. This cannot be edited. This is an audited field.
§ Due Date – the date that the Task should be completed by. This can be edited and is mandatory. This is an audited field.
§ Type – the read-only type of Task which will either be:
o Manual – the Task has been created manually as an ad-hoc Task.
o Workflow – the Task has been created automatically by Insight as a result of Workflow configuration.
§ Sub Type – the sub-type of ad-hoc Task being created. This list is client configurable and will therefore differ between clients. This is editable. This is an audited field.
§ Priority – the priority of the Task. This list is client configurable and will therefore differ between clients. This is editable. This is an audited field.
§ Current Status – the status of the Task. This can be either ‘Pending’ or ‘Complete’. It is read only since Tasks are completed using either the Complete button at the bottom of the Task Details (non-popup version) or the Complete icon on the Task List. This is an audited field.
§ Details – the details of the Task to be carried out.
§ Last Updated By – the name of the User that last edited the Task.
§ Notes – audited notes that will appear in the Task Details.
To save the changes made to the Task, click the Save button. This will return you to the Task list.
To complete a Task, click the Complete button.
To reallocate a Task, click the Reallocate button.
To view the source record that the Task is linked to, click the Link button.
Note: When linking to sales quality Sales Cases or Sales Case Checks, Insight will perform a further check to ensure you are allowed to see the details. This is based on the view permissions you have and your position in the supervision hierarchy. This is designed to prevent other people accessing Sales Case/Sales Case Check details that they
Completing Tasks
Tasks can either be completed by clicking the ![]() icon
against the relevant Task in the Task List, or by clicking the Complete button
at the bottom of the Task Details screen.
icon
against the relevant Task in the Task List, or by clicking the Complete button
at the bottom of the Task Details screen.
If the Task is a Workflow Activity Task and it is configured
to complete automatically, then the ![]() icon
will not be displayed. These Tasks will be automatically completed by Insight
when the correct conditions are met.
icon
will not be displayed. These Tasks will be automatically completed by Insight
when the correct conditions are met.
If the Task being completed is a manual ad-hoc Task, the Task will just complete.
If the Task is a Workflow Task that must be manually completed then Insight will check the necessary conditions have been met before the allowing the Task to be completed. The conditions required for each Task will depend on the Workflow Activity configuration that created the Task. If the conditions have not been met, a message similar to the one below will be displayed:
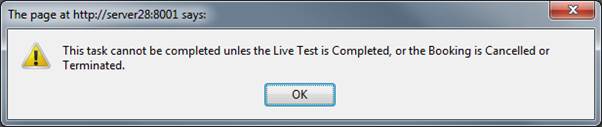
If the conditions are met, then the Task will be completed.
Once a Task has been completed, all fields will become read only. Completed Tasks cannot be reallocated or completed again. Completed Tasks cannot be ‘uncompleted’.
Completed Tasks will display a ![]() icon
in the first column on the Task list.
icon
in the first column on the Task list.
Reallocating Tasks
Tasks can be reallocated either by clicking the ![]() icon
against the relevant Task in the Task List, or by clicking the Reallocate
button at the bottom of the Task Details screen.
icon
against the relevant Task in the Task List, or by clicking the Reallocate
button at the bottom of the Task Details screen.
This will launch the Task Reallocation wizard:
Step 1 – Reallocate to…
The first step requires you to select whether you want to reallocate the Task to a Firm or an Individual (i.e. a User):
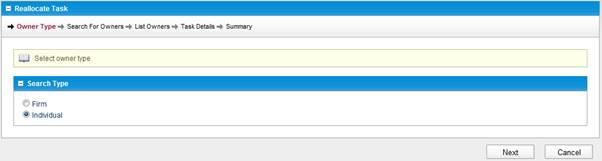
Step 2 – Search for Owner
The owner type selected in Step 1 will determine the nature of the search screen in Step 2. If ‘Individual’ is selected then this step will ask you to search for Users, if ‘Firm’ is selected then you will be required to search for Firms:
Searching for Users
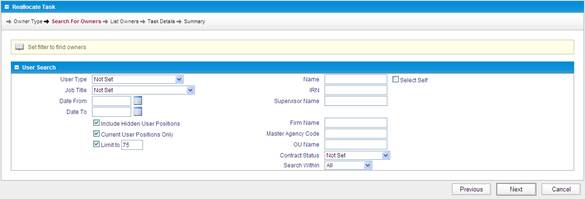
You can use a number of filters to identify the User you want to reallocate the Task to. If you know the name of the User, then the simplest method is to type all or part of their name into the Member Name filter. Another common search may be to use the Type (to search on User Types) or Job Title to search for a certain type of User. When you have entered your search criteria, click Next.
Searching for Firms
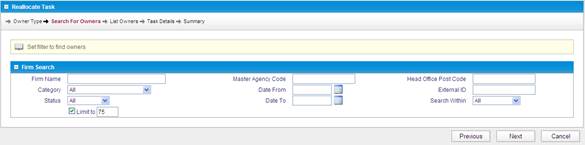
Alternatively, you can use a number of filters to identify the Firm you want to reallocate the Task to. If you know the name of the Firm, then the simplest method is to type all or part of their name into the Firm Name filter. When you have entered your search criteria, click Next.
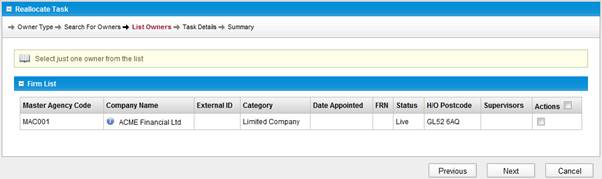
Step 3 – Select Owner
Depending on what has been searched for in the previous step, you must select either a User or a Firm in this step:
Selecting a User
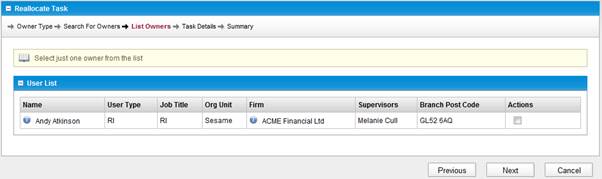
A list of Users will be returned based on the search criteria entered in the previous step. You must select one (and only one) to continue using the checkbox in the Actions column.
Selecting a Firm
Alternatively, a list of Firms will be returned based on the search criteria entered in the previous step. You must select one (and only one) to continue using the checkbox in the Actions column.
Step 4 – Update Task Details
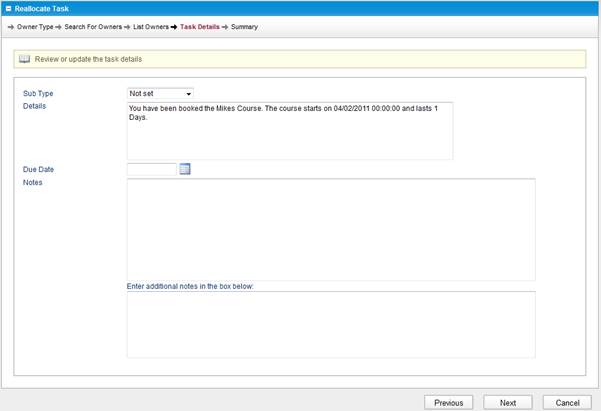
In this step, you can update certain information on the Task prior to reallocating it:
§ Sub Type – you can update the sub type of the Task.
§ Details – you can amend or add to the details of the Task.
§ Due Date – you can change the due date if you want to extend/reduce the amount of time to complete the Task.
§ Notes – you add to the audited notes on the Task.
Click Next when you want to proceed.
Step 5 - Summary
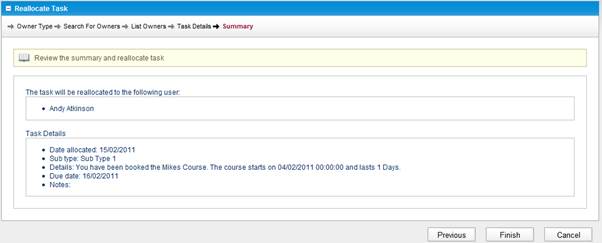
Check that you are happy with the details specified during the Wizard and then click Finish to complete the wizard and reallocate the Task.
Any change to the Owner of the Task will be audited, a history of owners will be available via the Task Owner field on the Task Details screen.
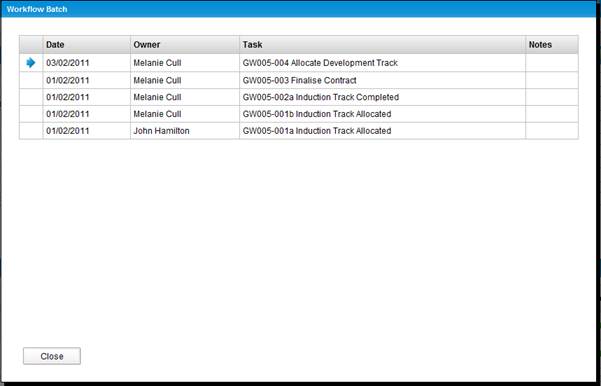
Workflow Trail
Clicking on the![]() icon will display a list of all linked Tasks that have been created within the
same Workflow. For long workflows this provides an audit trail back through
the workflow:
icon will display a list of all linked Tasks that have been created within the
same Workflow. For long workflows this provides an audit trail back through
the workflow:
Creating Tasks
To create a new ad-hoc Task, click on the ![]() button
at the bottom of the Task List screen, this will launch the Create Task wizard:
button
at the bottom of the Task List screen, this will launch the Create Task wizard:
Step 1 – Create Task for…
The first step requires you to select whether you want to create a Task for a Firm or an Individual (i.e. a User):

Step 2 – Search for Owner
The owner type selected in Step 1 will determine the nature of the search screen in Step 2. If ‘Individual’ is selected then this step will ask you to search for Users, if ‘Firm’ is selected then you will be required to search for Firms:
Searching for Users
You can use a number of filters to identify the User you want to create the Task for. If you know the name of the User, then the simplest method is to type all or part of their name into the Member Name filter. Another common search may be to use the Type (to search on User Types) or Job Title to search for a certain type of User. When you have entered your search criteria, click Next.
Searching for Firms

Alternatively, you can use a number of filters to identify the Firm you want to create the Task for. If you know the name of the Firm, then the simplest method is to type all or part of their name into the Firm Name filter. When you have entered your search criteria, click Next.
Step 3 – Select Owner
Depending on what has been searched for in the previous step, you must either select a User or a Firm in this step:
Selecting a User
A list of Users will be returned based on the search criteria entered in the previous step. You must select one (and only one) to continue using the checkbox in the Actions column.
Selecting a Firm
Alternatively, a list of Firms will be returned based on the search criteria entered in the previous step. You must select one (and only one) to continue using the checkbox in the Actions column.
Step 4 – Task Details
In this step, the details of the Task can be entered. The following information can be entered:
§ Date Allocated – the date that the Task was allocated to the Task owner. This defaults to today’s date and cannot be edited.
§ Due Date – the date that the Task should be completed by. This is mandatory.
§ Sub Type – the type of ad-hoc Task being created. This list is client configurable and will therefore differ between clients.
§ Priority – the priority of the Task. This list is client configurable and will therefore differ between clients.
§ Details – the details of the Task to be carried out.
§ Notes – audited notes that will appear in the Task Details.
Click Next when the Task Details have been entered.
Step 5 – Summary

This step enables you to review what you have entered in the previous steps.
Click Finish when you are happy to proceed and create the Task. You will be returned to the Task list, with the newly created Task now visible in the list.
Events (On Track and Off Track)
This widget on the Home Page displays a summary of the different Event types that have been allocated to the User. This widget can display different information depending on the currently selected View Mode (it works with all View Modes).

The four Event types that it displays are:
§ Assessments - an Assessment is normally used to evaluate some aspect of a User’s performance and is usually conducted by a Supervisor or Manager. Assessments can be of various different sub-types (called ‘Assessment Types) and can have formal output recorded against them via the use of e-Forms. Assessments are subdivided into Booked and Future Assessments. Booked Assessments are those that have been booked and therefore have both an Event and an Assessment Booking. Future Assessments are those that are yet to be booked. Depending on which mode Insight is running in, you may only see Booked Assessments in this widget.
§ Modules - the most basic type of Event in Insight, more of an ad-hoc Event that is completed out of system, with the completion of the Event being recorded in Insight together with some basic notes and perhaps an attached document.
§ Tests – an electronic examination in Insight, which is linked to internally or externally provided learning and reference material. Tests and their content are configurable in Insight.
§ Training – a Training Course is a course that forms part of the Course Portfolio. Training Courses can be scheduled as Training Events and people can be nominated and subsequently booked on to the course (to create Training Bookings).
It is possible to drilldown on each Event type to view a more detailed breakdown of, for example, Assessment Types.
For each Event Type, the following information is displayed:
§ Pending – The total number pending (outstanding) events of that type.
§ Overdue 1-14 days – The total number of events of that type that are pending and overdue by between 1 and 14 days.
§ Overdue 1-30 days - The total number of events of that type that are pending and overdue by between 1 and 30 days.
§ Overdue > 30 days - The total number of events of that type that are pending and overdue by more than 30 days.
§ Due next 7 days - The total number of events of that type that are pending and are due within the next 7 days.
§ Due next 14 days - The total number of events of that type that are pending and are due within the next 14 days.
§ Due next 30 days - The total number of events of that type that are pending and are due within the next 30 days.
It is possible to drilldown on each total to view a list of the Events in question in the relevant list screen.
Note: The Events widget does not display any Events that have a Due Date that is more than 30 days in the future.
Sales Cases with Action Required
This widget on the Home Page displays a summary of Sales Cases (new business submission) that have been submitted by the User. This widget can display different information depending on the currently selected View Mode (it works with all View Modes).

Note: this widget works off the supervision hierarchy (span of control) based on the Adviser of the Sales Case. It can however, be overridden, if the User has read only or read write on permission 415, then this widget will always show all sales cases.
The widget differentiates between the following two Sales Case statuses:
§ Action Required – indicates that the Sales Case has been checked by a Sales Case checker and they have deemed that it requires some action by the submitting adviser. The Sales Case must have a Last Check Status of ‘Action Required’ and the Issue Feedback checkbox must be selected.
§ Action Taken – indicates that the Sales Case has been checked, identified as requiring action by the adviser, and that the adviser has taken some action and resubmitted the Sales Case for checking again.
For each Sales Case status Type, the following information is displayed:
§ >7 days – The total number of Sales Cases in that status where it has been more than 7 days since the status was set (drilldown available).
§ >14 days - The total number of Sales Cases in that status where it has been more than 14 days since the status was set (drilldown available).
§ >30 days - The total number of Sales Cases in that status where it has been more than 30 days since the status was set (drilldown available).
§ 7-14 days - The total number of Sales Cases in that status where it has been between 7 and 14 days since the status was set.
§ 14-30 days - The total number of Sales Cases in that status where it has been between 14 and 30 days since the status was set.
It is possible to drilldown (where available) on each total to view a list of the Sales Cases in question in the Sales Case list.